# Introduction to microservices
If you just started in the microservices world, there are not a lot of documentation and examples. In this post, you will learn to launch your first microservices on Kubernetes, manage them with Istio, and build a clean workflow, from local development to production release.
# Prerequisites
First, you need a local Kubernetes cluster. For that, you can either install Minikube or use the one provided with Docker (Windows or Mac). Make sure you allocate enough RAM and CPUs to your local cluster or you will experience problems running Istio. For instance, I allocated 10GB of RAM and 4 CPUs. For more information about system requirements, see Platform Setup.
You may also want to install Helm, it will help you to install Istio more easily.
Finally, you need Skaffold to handle your development workflow. Again, follow the official documentation.
# Install Istio
To install Istio, follow the relevant Installation Guide. When asked to select a configuration profile, choose "demo-auth", it will enable every features. In a next blog post, we will go through most of them. Also, do not forget to allow the default namespace to use Istio injection:
$ kubectl label namespace default istio-injection=enabled
You can check your namespaces with:
$ kubectl get namespace -L istio-injection
And now, let the fun begin!
# Your first microservice
First, you need a package.json:
{
  "name": "api-hello",
  "version": "1.0.0",
  "description": "A very simple microservice. Answers 'world' to 'hello' requests.",
  "license": "MIT",
  "author": "Cyril Maréchal <me@cyril-marechal.net> (https://cyril-marechal.net)",
  "main": "src/index.js",
  "scripts": {
    "start": "pm2 start src/index.js",
    "dev": "nodemon src/index.js",
    "test": "mocha --exit",
    "coverage": "nyc npm run test"
  },
  "dependencies": {
    "express": "^4.17.1",
    "helmet": "^3.18.0",
    "pm2": "^3.5.1"
  },
  "devDependencies": {
    "chai": "^4.2.0",
    "chai-http": "^4.3.0",
    "eslint": "^5.16.0",
    "eslint-config-google": "^0.13.0",
    "mocha": "^6.1.4",
    "nodemon": "^1.19.1",
    "nyc": "^14.1.1"
  },
  "nyc": {
    "reporter": [
      "lcov",
      "text-summary"
    ]
  }
}
If you are not familiar with one of the packages I use, feel free to Google it.
Now, create .eslintrc.json:
{
  "extends": ["google"],
  "parserOptions": {
    "ecmaVersion": 10
  }
}
It will help you keep clean and consistent code. Additionally, use a .editorconfig:
# EditorConfig defines and maintains consistent coding styles between different
# editors and IDEs: http://EditorConfig.org/

# Top-most EditorConfig file
root = true

# All files
[*]
charset = utf-8
end_of_line = lf
insert_final_newline = true
indent_style = space
indent_size = 2
If you use Git, you do not want to push these files:
# <.gitignore>
# logs
logs
*.log
npm-debug.log*

# npm
node_modules

# coverage
coverage
.nyc_output
Then you need your production-grade code, src/index.js:
const express = require('express');
const helmet = require('helmet');

const app = express();
app.use(helmet());

const {PORT = 3000} = process.env;

app.get('/hello', (req, res, next) => {
  res.send('world');
});

app.get('/healthz', (req, res) => {
  res.json({status: 'ok'});
});

app.server = app.listen(PORT, () => {
  console.log(`application is listening on port ${PORT}`);
}).on('error', (error) => {
  if (app.server && app.server.listening) app.server.close();
  console.error(error);
  process.exitCode = 1;
});

module.exports = app;
And create the corresponding unit tests, test/index.test.js:
const chai = require('chai');
const expect = chai.expect;
const chaiHttp = require('chai-http');
chai.use(chaiHttp);

let app;

describe('basic', () => {
  before(() => {
    app = require('../src/index');
  });
  it('should run correctly', (done) => {
    chai.request(app)
        .get('/healthz')
        .end((err, res) => {
          expect(err).to.be.null;
          expect(res).to.have.status(200);
          expect(res).to.be.json;
          expect(res.body).to.be.not.null;
          expect(res.body.status).to.equal('ok');
          done();
        });
  });
  it('should answer `world` to `hello` requests', (done) => {
    chai.request(app)
        .get('/hello')
        .end((err, res) => {
          expect(err).to.be.null;
          expect(res).to.have.status(200);
          expect(res).to.be.html;
          expect(res.text).to.equal('world');
          done();
        });
  });
  after(() => {
    app.server.close();
    delete require.cache[require.resolve('../src/index')];
    app = undefined;
  });
});
describe('crashes', () => {
  it('should crash when port is already in use', (done) => {
    const http = require('http');
    const server = http.createServer((req, res) => {
      res.writeHead(200, {'Content-Type': 'text/plain'});
      res.end('Hello World\n');
    }).listen(3000);

    app = require('../src/index');
    app.server.on('error', (err) => {
      app.server.close();
      delete require.cache[require.resolve('../src/index')];
      app = undefined;
      server.close();
      done();
    });
  });
  it('should crash when simulated error', (done) => {
    app = require('../src/index');
    app.server.on('error', (err) => {
      app.server.close();
      delete require.cache[require.resolve('../src/index')];
      app = undefined;
      done();
    });
    app.server.emit('error', {error: 'simulated'});
  });
});
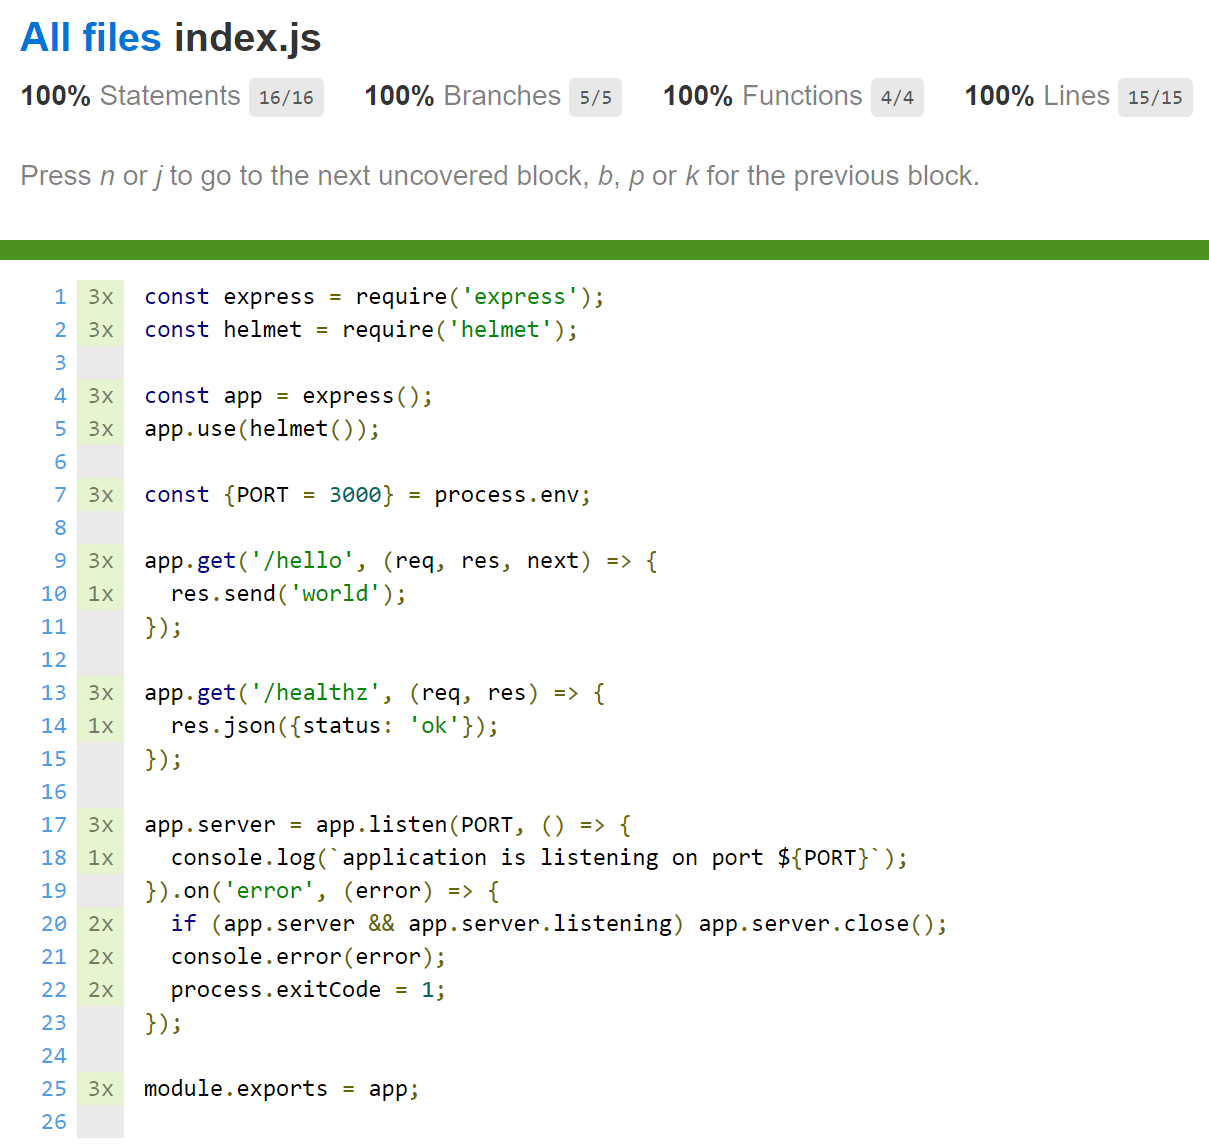
You can now run npm run test and npm run coverage. The later is really interesting as it creates a code coverage report that you can find in the coverage/lcov-report folder. Here, you can see we wrote great unit tests:
To be able to run your application on Kubernetes, you need a Docker image. A Dockerfile describes its content:
FROM node:lts

WORKDIR /usr/hello

COPY package*.json ./

RUN npm install

COPY . .

EXPOSE 3000
CMD [ "npm", "start" ]
Do not forget to ignore your node_modules folder:
# <.dockerignore>
node_modules
# Deployment
In order to use Skaffold, you have to create a skaffold.yaml file:
apiVersion: skaffold/v1beta13
kind: Config
build:
  artifacts:
  - image: api-hello
    context: src/api-hello
    sync:
      manual:
      - src: src/**/*.js
        dest: .
deploy:
  kustomize:
    path: ./kubernetes-manifests/overlays/production
profiles:
- name: dev
  activation:
    - command: dev
  deploy:
    kustomize:
      path: ./kubernetes-manifests/overlays/development
Here, we use kustomize to deploy our app. Depending on your needs, you could alternatively use kubectl or helm. Check out the official documentation to get more details about Deployers.
We also synchronize our local JavaScript files with the container. Thanks to nodemon (npm run dev), we will be able to hot-reload our app without either rebuilding its Docker image or redeploying it. To run the npm run dev command, we use an overlay which is triggered whenever you use the skaffold dev command.
Create a kubernetes-manifests folder so that your project structure looks like this:
.
├─ /kubernetes-manifests
│  ├─ /base
│  │  ├─ /api-hello
│  │  │  ├─ deployment.yaml
│  │  │  ├─ gateway.yaml
│  │  │  └─ service.yaml
│  │  └─ kustomization.yaml
│  └─ /overlays
│     ├─ /development
│     │  ├─ /api-hello
│     │  │  └─ deployment.yaml
│     │  └─ kustomization.yaml
│     └─ /production
│        └─ kustomization.yaml
├─ /src
│  └─ /api-hello
│     ├─ /src
│     │  └─ index.js
│     ├─ /test
│     │  └─ index.test.js
│     ├─ .dockerignore
│     ├─ .editorconfig
│     ├─ .eslintrc.json
│     ├─ .gitignore
│     ├─ Dockerfile
│     └─ package.json
└─ skaffold.yaml
Kustomize files (kustomization.yaml) declare resources it uses. Overlays (development/production) add minor tweaks to the base.
# <base/kustomization.yaml>
resources:
# api-hello
- ./api-hello/deployment.yaml
- ./api-hello/gateway.yaml
- ./api-hello/service.yaml
# <overlays/development/kustomization.yaml>
bases:
  - ../../base
patches:
  - ./api-hello/deployment.yaml
# <overlays/production/kustomization.yaml>
bases:
  - ../../base
# NOTE: here you may want to tweak allocated computing resources to your pods
Now, let's create the patch so that our app uses npm run dev instead of npm start:
# <overlays/development/api-hello/deployment.yaml>
apiVersion: apps/v1
kind: Deployment
metadata:
  name: api-hello-v1
  labels:
    app: api-hello
    version: v1
spec:
  selector:
    matchLabels:
      app: api-hello
      version: v1
  replicas: 1
  template:
    metadata:
      labels:
        app: api-hello
        version: v1
    spec:
      containers:
      - name: api-hello
        image: api-hello
        command: ["npm"]
        args: ["run", "dev"]
        ports:
        - containerPort: 3000
Finally, we can create our app resources:
# <base/api-hello/deployment.yaml>
apiVersion: apps/v1
kind: Deployment
metadata:
  name: api-hello-v1
  labels:
    app: api-hello
    version: v1
spec:
  selector:
    matchLabels:
      app: api-hello
      version: v1
  replicas: 1
  template:
    metadata:
      labels:
        app: api-hello
        version: v1
      annotations:
        sidecar.istio.io/rewriteAppHTTPProbers: "true"
    spec:
      containers:
      - name: api-hello
        image: api-hello
        ports:
        - containerPort: 3000
        livenessProbe:
          httpGet:
            path: /healthz
            port: 3000
          initialDelaySeconds: 5
          periodSeconds: 5
        readinessProbe:
          httpGet:
            path: /healthz
            port: 3000
          initialDelaySeconds: 5
          periodSeconds: 5
We rewrite Istio's default HTTP probes, this enables us to check that our app is running well. The /healthz path could also check e.g. a database connection.
# <base/api-hello/service.yaml>
apiVersion: v1
kind: Service
metadata:
  name: api-hello
  labels:
    app: api-hello
    service: api-hello
spec:
  ports:
  - port: 3000
    name: http
  selector:
    app: api-hello
# <base/api-hello/gateway.yaml>
apiVersion: networking.istio.io/v1alpha3
kind: Gateway
metadata:
  name: api-hello-gateway
spec:
  selector:
    istio: ingressgateway # use Istio default gateway implementation
  servers:
  - port:
      number: 80
      name: api-hello-http
      protocol: HTTP
    hosts:
    - "*"
---
apiVersion: networking.istio.io/v1alpha3
kind: VirtualService
metadata:
  name: api-hello-ingress
spec:
  hosts:
  - "*"
  gateways:
  - api-hello-gateway
  http:
  - match:
    - uri:
        prefix: /api/hello
    route:
    - destination:
        host: api-hello
        port:
          number: 3000
We use Istio's ingress to route our traffic to our service. This way, we can access our api-hello microservice at http://${CLUSTER_IP}:${CLUSTER_PORT}/api/hello/hello.
To get CLUSTER_IP, refer to your local cluster documentation. If you use Minikube, simply run:
$ minikube ip
Finally, you can get CLUSTER_PORT by running this command:
$ kubectl get service istio-ingressgateway -n istio-system
Check for port 80, then take the corresponding node port. By default, it should be 31380.
Now, use skaffold dev for local developement and skaffold run to deploy to production. Do not forget to use the right kubectl context. To check your current context, use:
$ kubectl config get-contexts
To switch to a different context, you can use:
$ kubectl config use-context <YOUR_CONTEXT>
# Going further
You now have the basic knowledge to properly build your own microservices. For example, you could now deploy a message broker (e.g. RabbitMQ) and then create an "api-user" microservice which asynchronously sends a confirmation email. This is exactly what I have built for UniMate, when we switched from a fully-synchronous monolith. This way, I sped up signup requests of more than 200ms.
I will not detail how to design microservices architectures. I highly recommend you to check out the different patterns available online. You can also find a lot of great books and talks on the subject.
In a next blog post, we will use Istio features to monitor our microservices.